Develop an Application
The views you use most while writing code: changing settings (Kconfig), configuring pins, configuring GATT services, handling build errors, and seeing where the memory goes. The examples use the IPRO7AI Reef EVK V4.0.
Change settings (Kconfig)
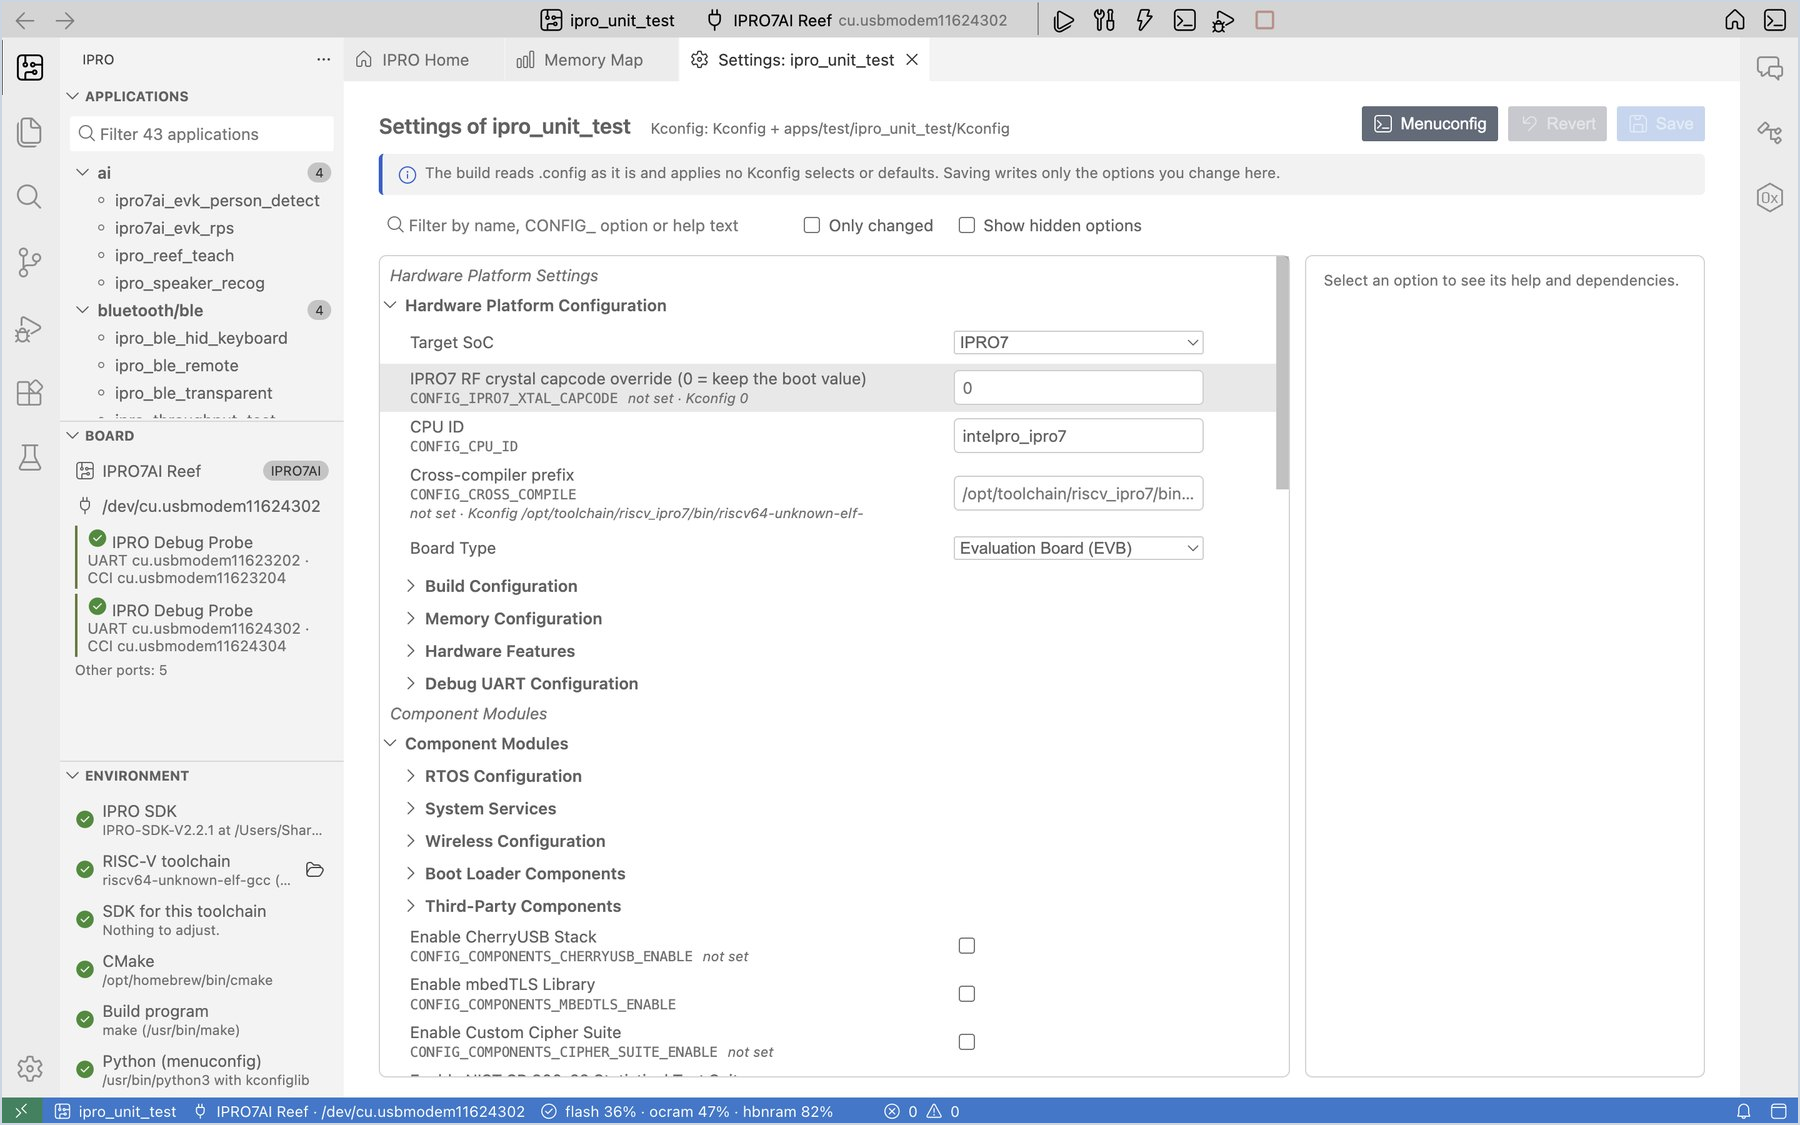
The features and parameters of each application are recorded in its .config. The Settings view edits it in a form, so you do not need to open a terminal.
-
Open Settings. Right-click the application and choose Settings (Kconfig)… (or Settings (Kconfig) on IPRO Home).
You should see: a Settings: <application> tab, with all options listed by Kconfig menu on the left and the help for the selected option on the right.
-
Change an option. Type the option you want to change in the search box, for example
LOG_BUFFER_SIZE, and change its value to512.You should see: a green mark appears on the left of that row, an unsaved dot appears in the tab title, and the button in the top-right corner changes to Save 1. The right panel shows the option's type, range, dependencies, its original value in
.configand the Kconfig default. -
Save. Click Save (
Cmd+Son macOS,Ctrl+Son Windows).You should see: the notification "Saved 1 settings to .config of … (the previous file is .config.old). The next build configures again."
Important
The SDK build reads .config directly and does not apply Kconfig selects or defaults. Settings writes only the lines you changed; if menuconfig would also change other options, they are listed on screen, and you decide whether to Take Them Too.
Other uses:
- Check Only changed to see only the changes that are not saved yet; click Revert to discard all changes.
- Check Show hidden options to see the options whose dependencies are not met: menuconfig hides them, but the build still reads them.
- If you prefer a text interface, right-click and choose Menuconfig to edit the same settings in a terminal; choose Open .config to edit the file directly.
Configure pins
Pin Configuration assigns the function of each GPIO on a package drawing and in a table, checks for conflicts and against the board's wiring, and generates the initialization code app_pins.h and app_pins.c.
-
Open Pin Configuration. Right-click the application and choose Pin Configuration… (or Pins on IPRO Home).
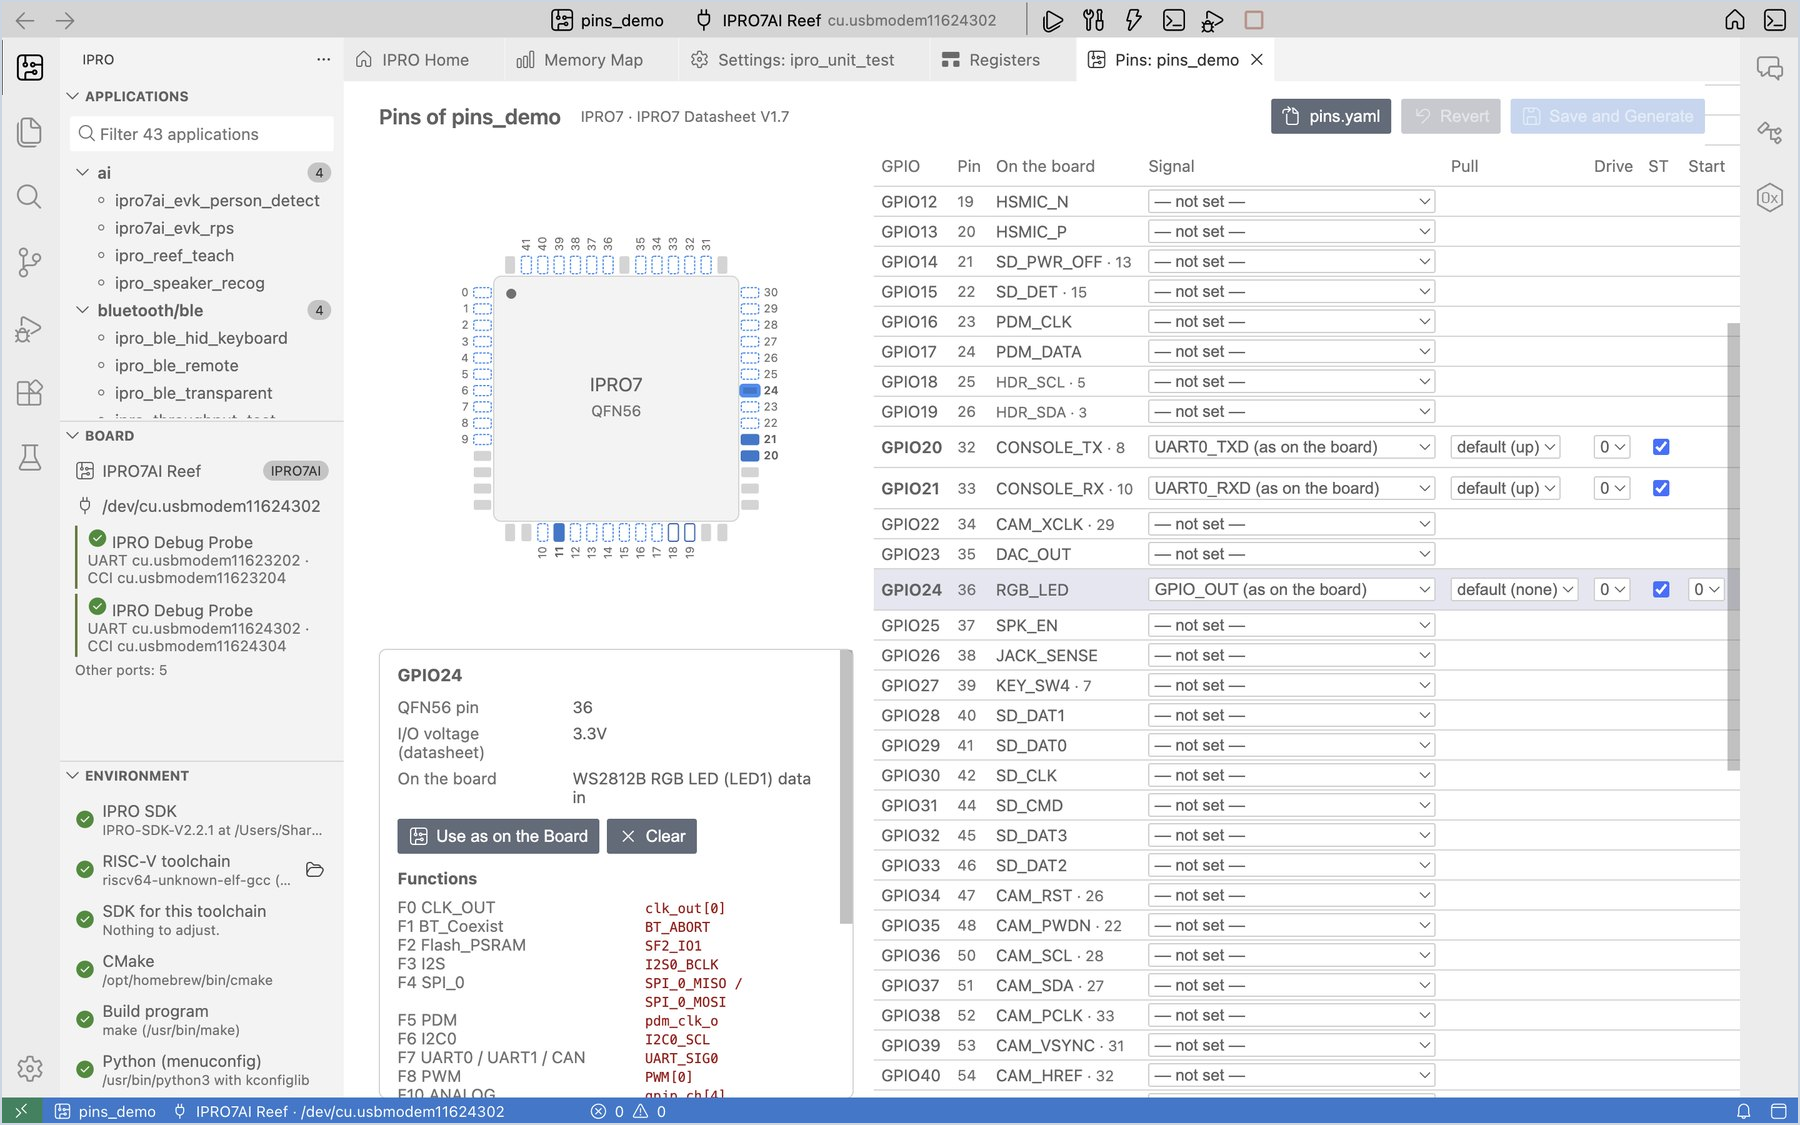
You should see: the QFN56 package drawing on the left and the GPIO table on the right. Board is set to IPRO7AI Reef V4 automatically, the On the board column lists what each pin is connected to on the board, and pins that go to the 40-pin header also show the header pin number.
-
Assign a pin. Click the GPIO24 row, choose GPIO_OUT (as on the board) under Signal, and enter
RGB_LEDunder Label.You should see: pin 24 turns blue on the package drawing; the right panel lists the pin's available functions, I/O voltage and board wiring;
app_pins.cunder Generated code at the bottom gets a GPIO24 line, and "No problems." is shown. -
Try a conflict. Change the signal of GPIO24 to
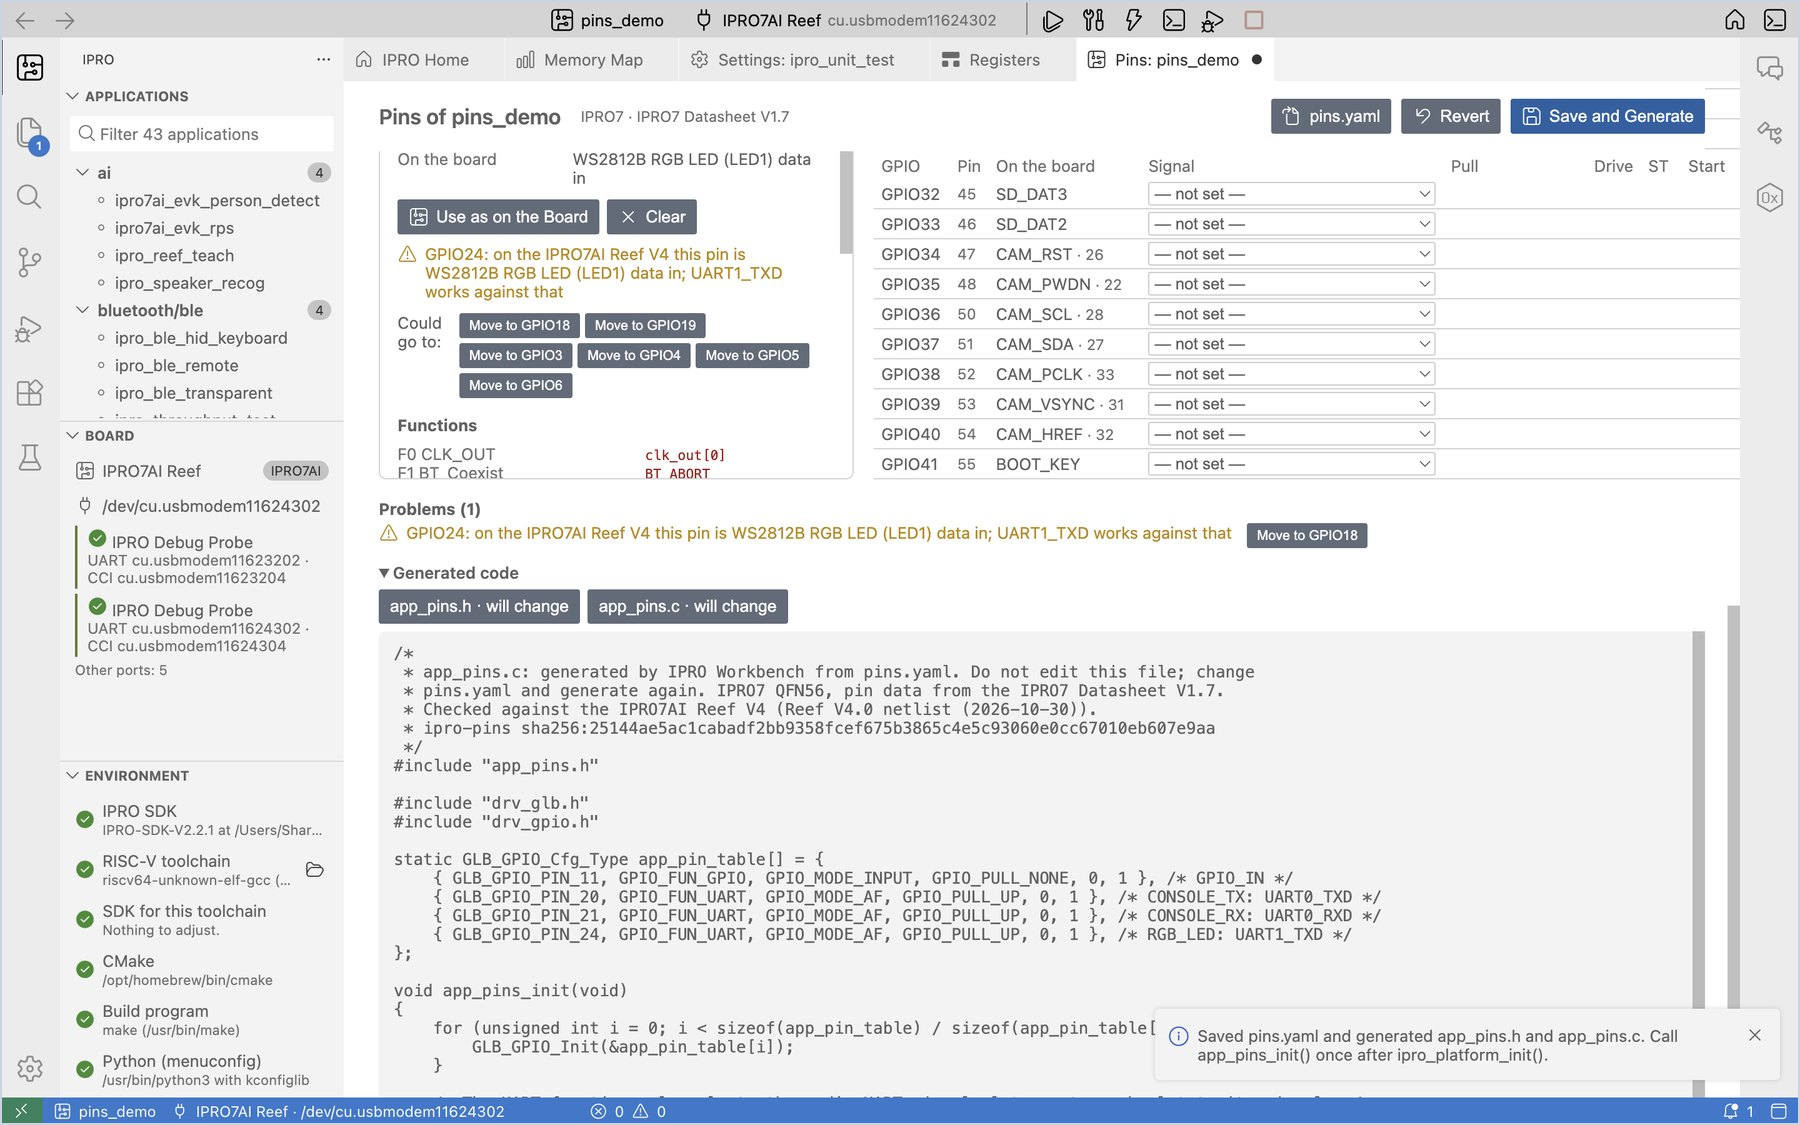
UART1_TXD.You should see: pin 24 turns amber, and Problems lists a warning saying that this pin is wired to the RGB LED on Reef V4, together with the free pins this signal Could go to; click Move to GPIO… to move the setting there. When you have seen this, change GPIO24 back to GPIO_OUT (as on the board).
-
Search by signal. Type
SDH_0in the search box.You should see: the table shows only the pins that can carry SDH_0, and those pins are outlined on the package drawing. Clear the search text and the full table comes back.
-
Save and generate. Click Save and Generate (
Cmd+S/Ctrl+S).You should see: the notification "Saved pins.yaml and generated app_pins.h and app_pins.c." The application folder now has
pins.yaml,app_pins.handapp_pins.c, andCMakeLists.txthas a newapp_pins.cline. -
Call the generated code. In
main.c, add#include "app_pins.h"and callapp_pins_init();once on the line afteripro_platform_init();, and then click Build, Flash and Monitor.You should see: the application runs as usual. From now on, whenever
pins.yamlchanges, IPRO Build first showspins: wrote app_pins.c from pins.yamlduring the build and then starts compiling.
| Function | Description |
|---|---|
| Only pins in use | Lists only the pins that are set, for easy checking |
| Export CSV | Writes a pin list for hardware engineers, pins.csv |
| Export Zephyr pinctrl | Writes the same pin configuration as a Zephyr pinctrl fragment, app_pins_pinctrl.dtsi |
| Use as on the Board | Sets the selected pin to its use on the board |
Note
app_pins.handapp_pins.care generated by the IDE; do not edit them by hand. The IDE does not simply overwrite a file that was edited by hand; it first asks whether to Overwrite it.- When
pins.yamlhas errors, the build stops, and the errors are listed in the Problems panel. - The pin data comes from the IPRO7 datasheet.
Configuring GATT Services
GATT Configuration defines the GATT services and characteristics of a BLE application in a tree and a form, keeps them in gatt.yaml, and generates app_gatt.h and app_gatt.c: one BT_GATT_SERVICE_DEFINE per service, and for each characteristic functions that read and change its value and send notifications. The application does not write the GATT attribute table itself.
The application's .config needs CONFIG_BLUETOOTH_LE_ENABLE=y and CONFIG_BT_PERIPHERAL=y, as ipro_ble_remote has.
-
Open GATT Configuration. Right-click the application and choose GATT Configuration… (or GATT services on IPRO Home).
You should see: a GATT: <application> tab opens. While there is no
gatt.yamlyet, a note at the top says to add a service first. -
Add a service. Click + Service and change the name to
sensor.You should see:
sensorappears in the list on the left; its UUID is already a random 128-bit UUID, and New gives another one. -
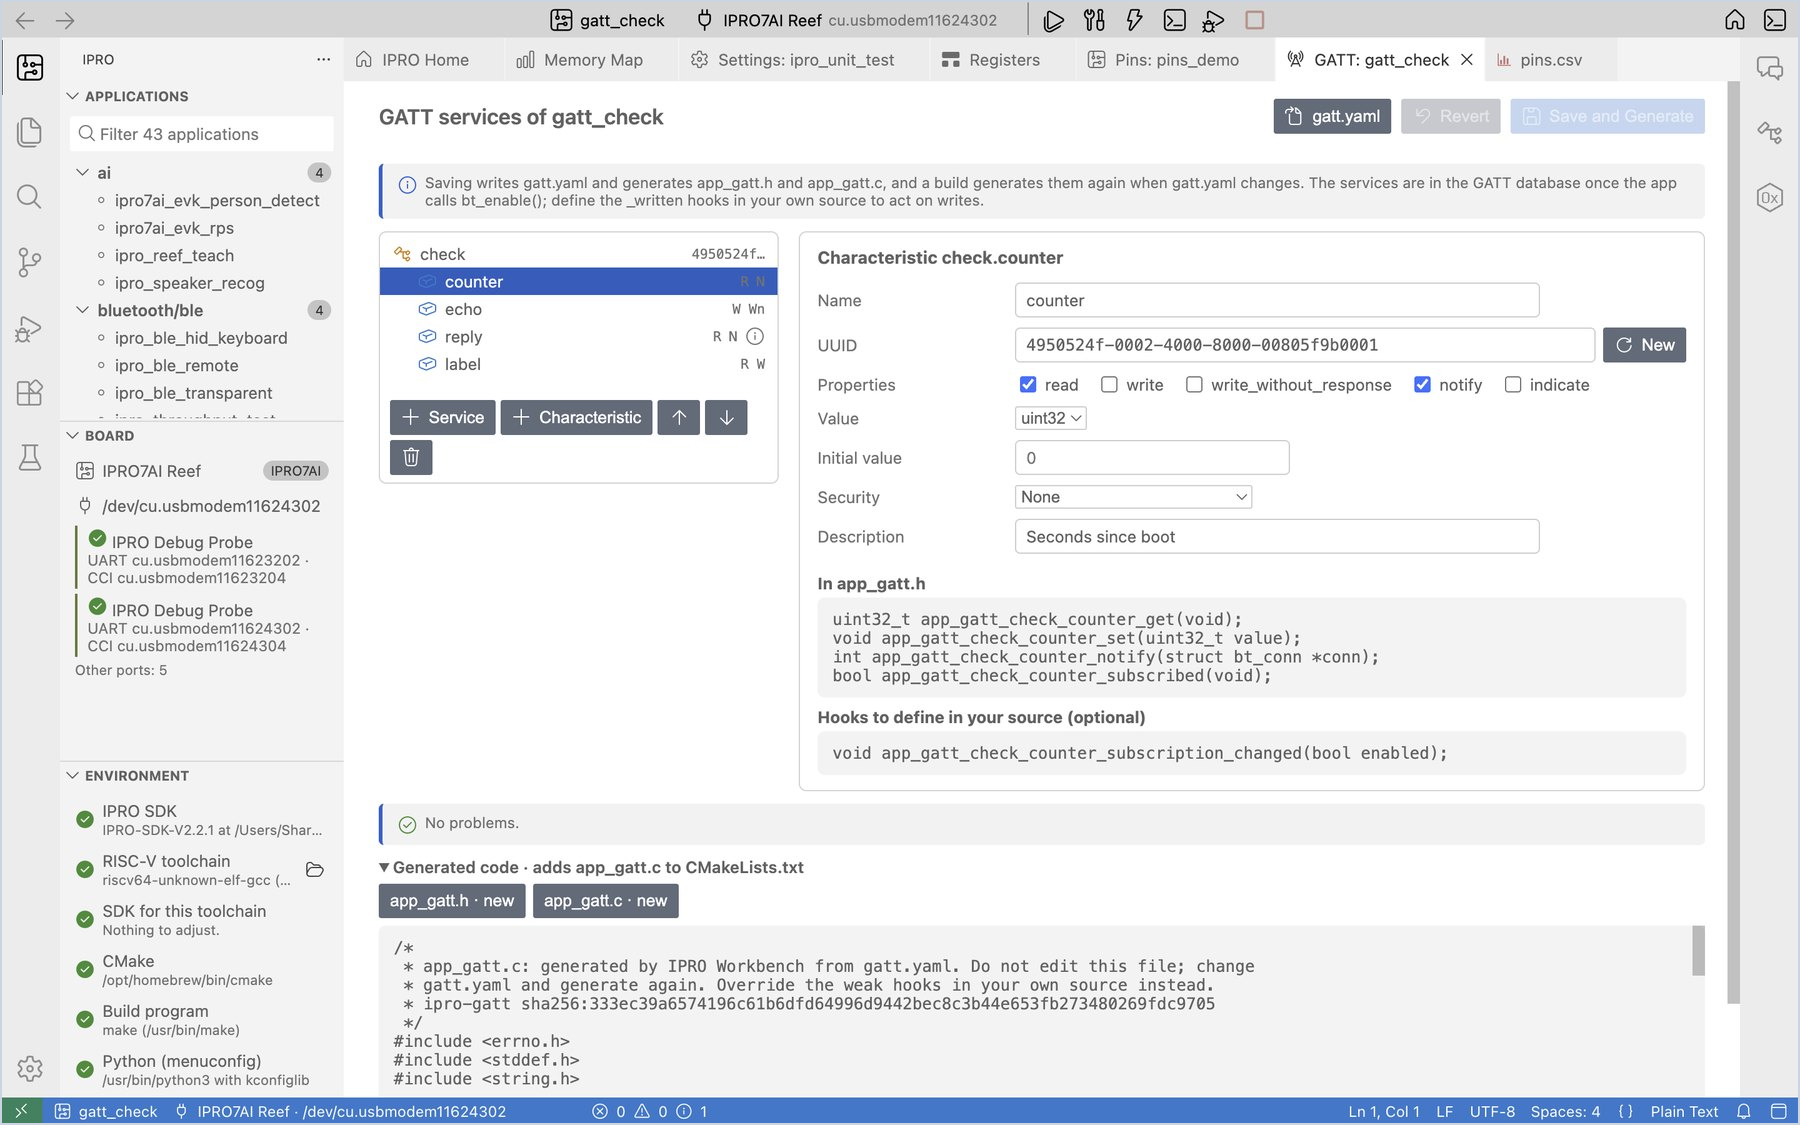
Add a characteristic. Click + Characteristic, change the name to
counter, check the properties read and notify, choose the value typeuint32, and enterSeconds since bootas the description.You should see: In app_gatt.h on the right lists
app_gatt_sensor_counter_get,_set,_notifyand_subscribed, and below it the hook you may define,app_gatt_sensor_counter_subscription_changed; "No problems." is shown. -
Try an invalid UUID. Change the UUID to
2a1.You should see: the problems list says
sensor.counter: "2a1" is not a 16-bit UUID such as 2a19 or a 128-bit UUID, and the generated code is replaced by "Fix the errors to see the generated code." Click New to get a valid UUID back. -
Save and generate. Click Save and Generate (
Cmd+S/Ctrl+S).You should see: the notification "Saved gatt.yaml and generated app_gatt.h and app_gatt.c." appears. The application folder now has
gatt.yaml,app_gatt.handapp_gatt.c, andCMakeLists.txthas a new line forapp_gatt.c. -
Use the generated functions in your code. Add
#include "app_gatt.h", update the value in your own task and notify the peers that subscribe; put the service UUID in the advertising data so that a peer scanning for it can find the board:#include "app_gatt.h" static const struct bt_data ad[] = { BT_DATA_BYTES(BT_DATA_FLAGS, (BT_LE_AD_GENERAL | BT_LE_AD_NO_BREDR)), BT_DATA_BYTES(BT_DATA_UUID128_ALL, APP_GATT_SENSOR_UUID_VAL), }; /* Once a second, in your own task (not in an interrupt) */ app_gatt_sensor_counter_set(seconds); if (app_gatt_sensor_counter_subscribed()) { app_gatt_sensor_counter_notify(NULL); /* NULL: every subscribed peer */ }Click Build, Flash and Monitor.
You should see: IPRO Build first shows
gatt: wrote app_gatt.c from gatt.yamland then compiles. Connected with a BLE tool on a phone or computer (for example nRF Connect), you see thesensorservice andcounter; once you subscribe to notifications, a new value arrives every second.
| Setting | Meaning |
|---|---|
| Properties | read, write, write_without_response, notify, indicate; with notify or indicate a CCC is added so that peers can subscribe |
| Value type | uint8 to int32 (fixed size, sent little-endian), bytes, string (longest value 1–512 bytes) |
| Initial value | A number for the integers (0x1f works too); text for string; hex for bytes, for example 01 02 ff |
| Security | For an encrypted link or an authenticated (MITM-protected) pairing, .config needs CONFIG_BT_SMP=y |
| Description | Goes into the Characteristic User Description, which BLE tools show |
The functions generated for each characteristic (service sensor, characteristic counter):
| Function | Use |
|---|---|
app_gatt_sensor_counter_get / _set |
Read and change the value peers read |
app_gatt_sensor_counter_notify / _indicate |
Send the current value to subscribed peers (with notify / indicate) |
app_gatt_sensor_counter_subscribed |
Whether a peer has subscribed |
app_gatt_sensor_counter_written (hook) |
Called after a peer writes, with the value already stored; define a function of that name in your own source |
app_gatt_sensor_counter_subscription_changed (hook) |
Called when a peer turns notifications on or off |
Note
app_gatt.handapp_gatt.care generated by the IDE; do not edit them by hand. The hooks are weak functions: a function of the same name in your own source replaces them. The IDE does not simply overwrite a file that was edited by hand; it first asks whether to Overwrite it.- When
gatt.yamlhas errors, the build stops, and the errors are listed in the Problems panel. - Notifications longer than 20 bytes arrive whole only after the peer raises the ATT MTU; one notification carries at most 244 bytes.
- A peer that paired before the services changed may keep the old service list; forget the device in the peer's Bluetooth settings and pair again.
Build and errors
-
Build. Click Build (
Cmd+Alt+B/Ctrl+Alt+B).You should see: on success, the notification "Built <application> in N s", followed by the memory usage.
-
Go to the error. When the code has errors, the notification says "<application> did not compile. First error at <file>:<line>: <message>". Click Go to Error, and the editor jumps to that line; the Problems panel lists all errors and warnings.
-
Fix and build again. Fix the code and build again. If needed, you can click Ask AI to Fix on the notification (see AI Assistant).
| Command | When to use it |
|---|---|
| Build | The usual case. Recompiles only the files that changed. |
| Reconfigure and Build | After you change CMakeLists.txt or the build profile; runs the CMake configuration again. |
| Clean | Deletes the application's build folder, so the next build starts from scratch. |
The build profile (Debug / Release / MinSizeRel) is selected with the ipro.build.profile setting; see Settings.
See where the memory goes
-
Open the memory map. After a successful build, click the memory usage in the status bar, or What uses the memory on IPRO Home.
You should see: "Memory map of <application>", with one tab each for flash, ocram and hbnram. Below them, the libraries, object files and symbols are listed by size, with each one's share of that region. Double-click a symbol to search for it in the workspace.
-
Filter. Type the name of a library, object file or symbol in the filter box to see only the matching items.
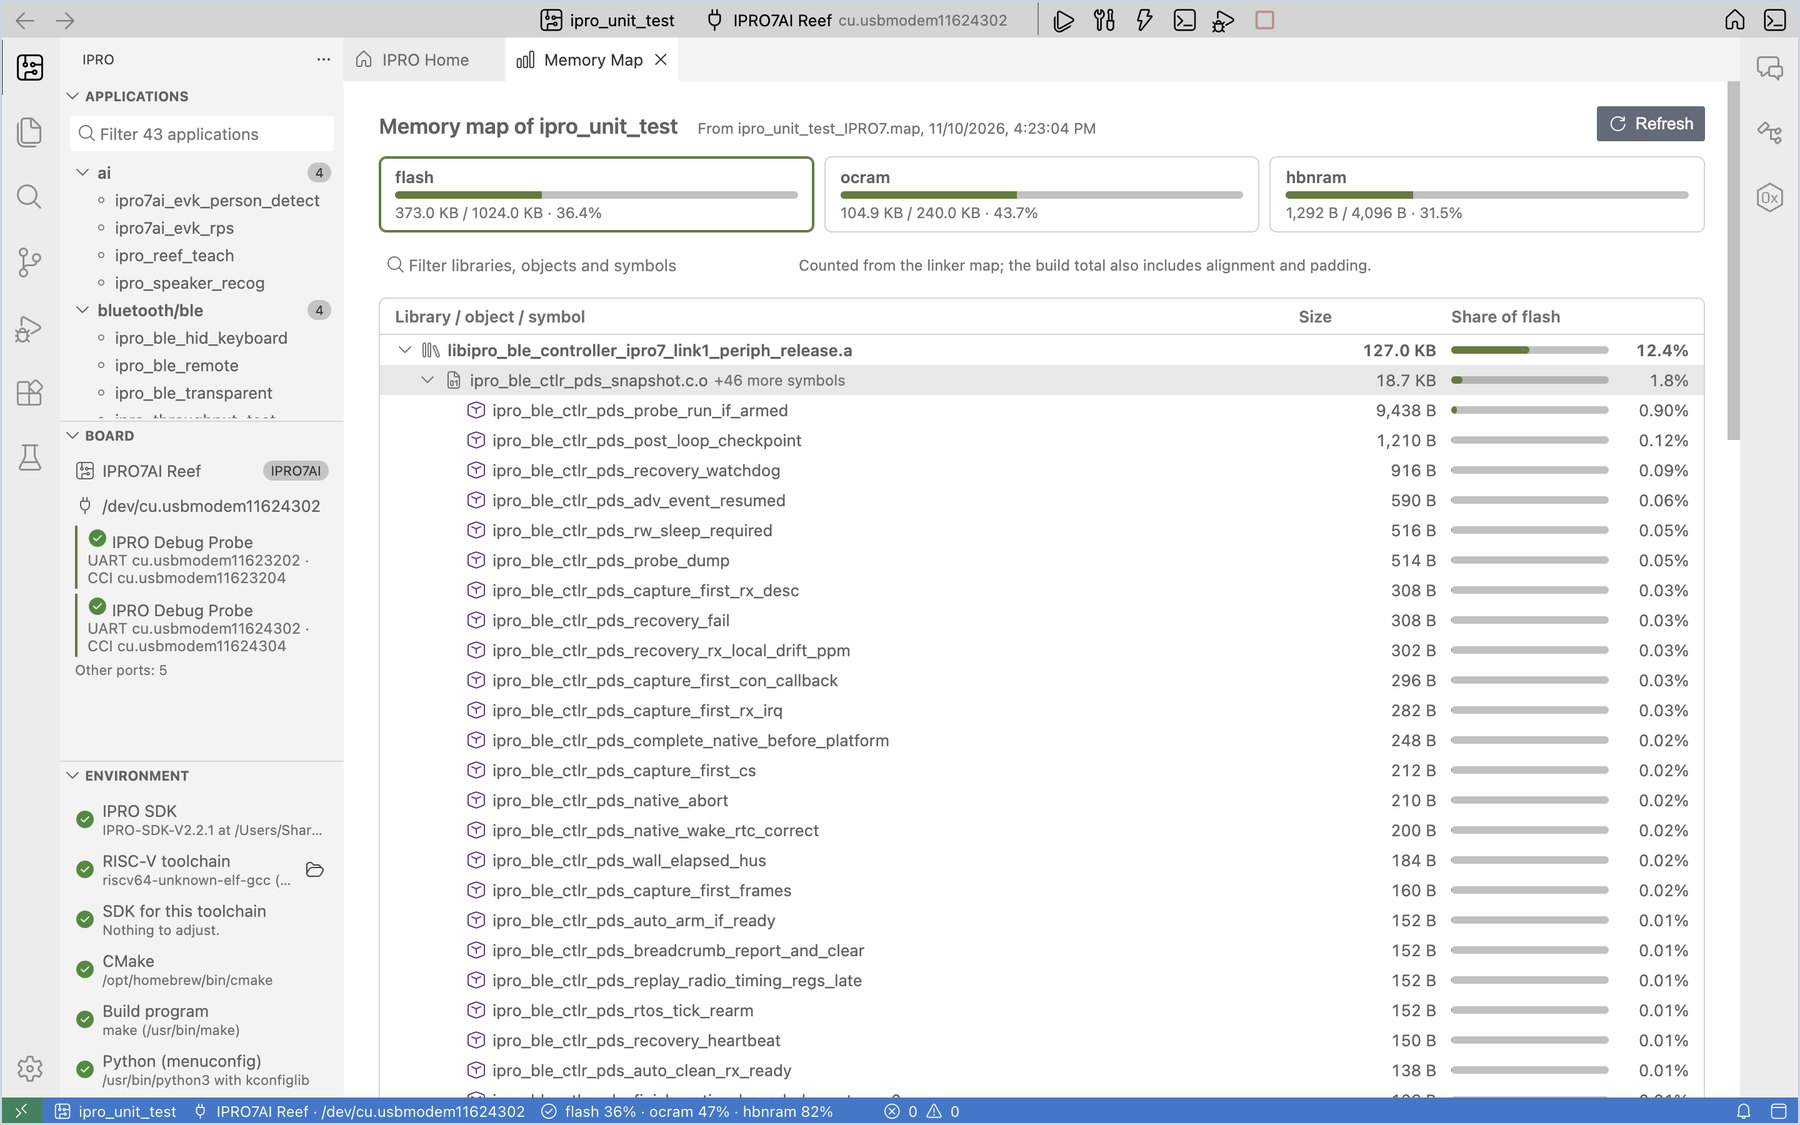
- (the application itself) is the object files in the application folder.
- (merged strings and constants) is the string pool shared by all objects; it gets large when there are many log strings.
- The numbers are counted from the linker map file; the totals in the build output also include alignment and padding, so the two may differ slightly.
Size changes and the memory budget
-
See the size change. Change the code, build again, and look at the last few lines of the IPRO Build output.
You should see: for example
Memory since the last build: flash +3,072 B, ocram 0 B, …, followed by the symbols that changed most, for example+3,072 B my_table (flash, (application) main.c.o). The build-finished notification also adds the change after the usage, for exampleflash 8.2% (+3,072 B). After the first build, or after a clean, there is no previous build to compare with, so these lines do not appear. -
Set a memory budget. Open Settings (
Cmd+,on macOS,Ctrl+,on Windows), search foripro.build, and in Memory Budget enter the maximum percentage for each region, for example{ "flash": 90, "ocram": 95 }.You should see: when a limit is exceeded, the notification reads "… is over its memory budget: flash 92.1% > 90%." Click Memory Map to see what used it up.
-
Fail the build over budget (optional). Also check Fail Over Budget to make a build over the budget fail; Build, Flash and Monitor then stops before flashing.