Flashing and the Board
The checks the IDE makes for you when flashing, the partition table, the board's flash, the firmware check and writing AI models; the last section covers the IPRO6S EVK and where it differs from the IPRO7 series. The board in the other sections is the IPRO7AI Reef EVK V4.0 on the IPRO Debug Probe; flashing uses IntelProCube.
Flash
-
Flash. After you select the application and build it, click Flash (
Cmd+Alt+U/Ctrl+Alt+U).You should see: the Output panel switches to IPRO Flash and shows the IntelProCube flashing progress; the last line is
[All Success]. A notification says "Flashed <application> in N s." -
The monitor closes and reopens. Before flashing, the IDE automatically closes every serial monitor (one port cannot be used by two programs at the same time). With Build, Flash and Monitor, the monitor opens again after a successful flash.
Important
When IntelProCube fails to flash, it sometimes reports no error. The IDE counts a flash as successful only when [All Success] appears in the output; after the board reboots, the IDE also checks the build time the board prints (see Board flash and firmware check).
When flashing fails, the IDE offers buttons that match the cause:

| Situation | What the IDE does |
|---|---|
| The application has not been built | Says it "has not been built yet" and offers Build and Flash |
| IntelProCube is not found | Offers Install IntelProCube, or Browse… to point to one you already have |
| The board does not answer | Asks you to check the probe cable and the power, and offers Select Port and Retry |
| The port is in use by another program | Asks you to close that program, then Retry |
| The partition table is larger than the board's flash | Asks before flashing; you can Flash Anyway or open the Partition Table instead |
| IntelProCube lacks the partition table this board needs | Does not flash (without the table the board would not boot); offers Partition Table and Install IntelProCube |
Partition table
The partition table decides where in flash the firmware, OTA slot B, the AI model (mfg) and other data are placed.
-
Open the partition table. Right-click the application and choose Partition Table (or click Partition table under Tools on IPRO Home).
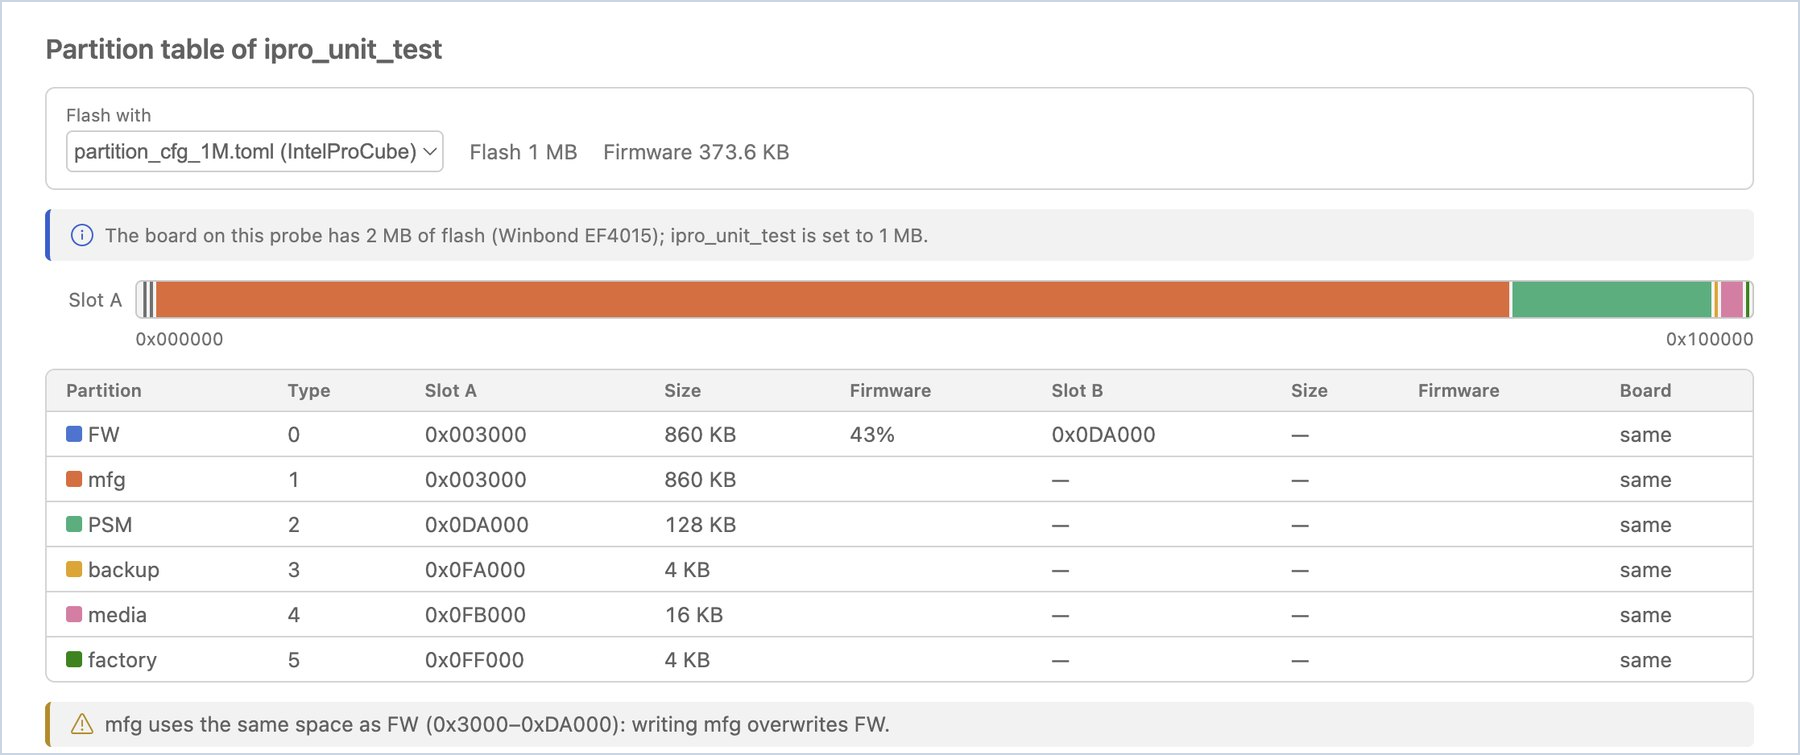
You should see: "Partition table of <application>". Flash with shows the partition table this flash uses (by default, the one IntelProCube picks from the flash size in
.config); next to it are the flash size set in.configand the firmware size. When the IDE knows the board's flash, it adds a comparison line, for example "The board on this probe has 2 MB of flash (Winbond EF4015); ipro_unit_test is set to 1 MB." Below that are the flash map (one row each for slot A and slot B), the address and size of every partition, and the share of the FW partition that the firmware takes. -
Read the check results below the table.
You should see: when there is no problem, nothing is listed. When there is a problem, it is explained, for example: mfg and FW of the 1M partition table share the same space (writing an AI model overwrites the firmware), FW slot B of the 2M partition table overlaps mfg (an OTA update overwrites the AI model), or the firmware is larger than slot A.
-
Use the application's own table. When the application ships its own partition table, the page says "This application ships …". Select it in Flash with, and every later flash of this application uses it.
-
Compare with the board. With the serial monitor open, click Reset Board.
You should see: On the board compares against the partition table the board prints at boot and marks each partition "same", "differs" or "not on the board". When they all match, it shows "The board printed the same table at its last boot."
Warning
Flashing writes the partition table selected in Flash with. When it differs from the partition table on the board, partitions whose location changes (for example the AI model in mfg) lose their data.
Board flash and firmware check
At boot, the board prints the ID of its flash and the build time of its firmware. With the serial monitor open, the IDE reads these messages and shows them in the Board view of the side bar:
| Shown | Meaning |
|---|---|
| Flash Winbond 2 MB (EF4015) | The flash and its size on the board on this probe |
| Chip ID … | The chip ID that IntelProCube read while flashing |
| Runs ipro_unit_test (built …) | The build time the board printed at boot matches the firmware of this application's last build |
| Runs other firmware (built …) | The board is not running the last build; that build runs only after you flash it |
If "other firmware" appears right after a flash, the flash may not really have reached the board. The IDE warns you and offers Flash Again.
When the partition table uses more space than the board's flash (for example a 4 MB partition table selected for a 2 MB board), the IDE asks you before flashing, so that the part past the end is not left unwritten. Click Partition Table to pick another one, or click Flash Anyway once you have confirmed it is correct.

AI model
The IPRO7AI NPU model (.inm) lives in the mfg partition of the flash and is not linked with the firmware. To update the model, you only write mfg; the firmware does not need to be flashed again.
-
Choose the model. Right-click the application and choose AI Model… (or click AI model under Tools on IPRO Home). In Model, choose an
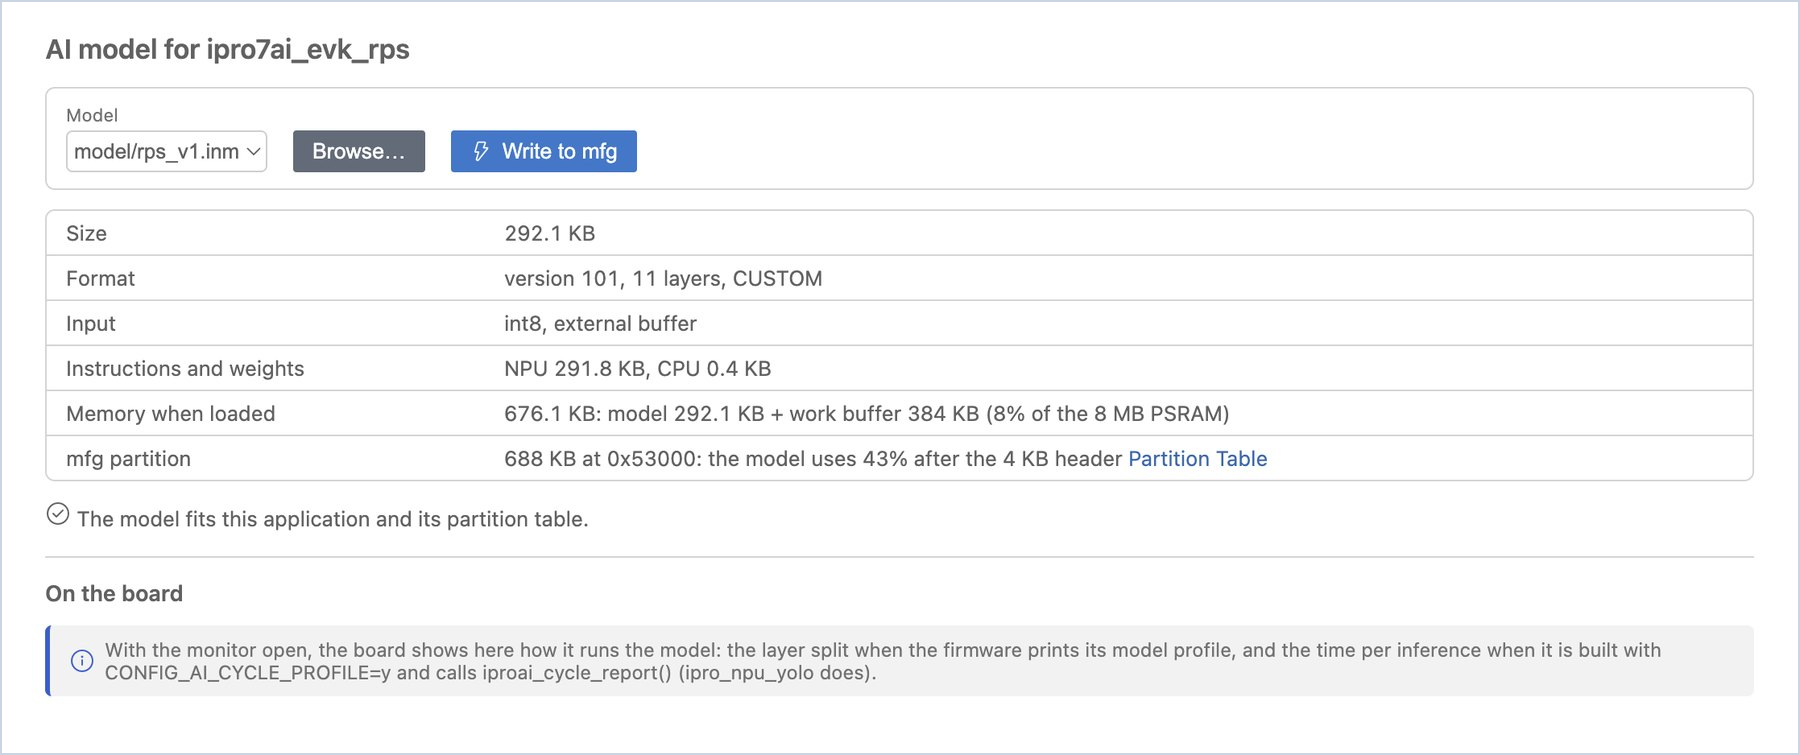
.inmin the application folder, or click Browse… to choose another file.You should see: the model's size, format version and number of layers, input, NPU and CPU instructions and weight sizes, the memory it takes once loaded (model plus work buffer, against the 8 MB PSRAM), and the mfg partition it goes into. The last line says "The model fits this application and its partition table." or why it does not fit.
-
Write it. If it fits, click Write to mfg.
You should see: a notification says "Wrote … to the mfg partition in N s." Only the model is written; the firmware is untouched.
-
Watch it on the board. While the board runs the model (with the serial monitor open), On the board shows whether each layer runs on the NPU or the CPU. When the firmware is built with
CONFIG_AI_CYCLE_PROFILE=yand callsiproai_cycle_report(), it also shows the time per inference and how busy the NPU and the CPU are.
Note
The IntelProCube 1M partition table has no separate space for the model (mfg overlaps FW), so the IDE refuses to write it. In Partition Table, select the partition table that comes with the application (for example the one with a separate mfg), then write the model.
IPRO6S EVK
IPRO Workbench builds, flashes and monitors the IPRO6 applications of the IPRO SDK (CONFIG_CHIP="IPRO6" in .config); the board is the IPRO6S EVK. This section uses platform/ipro6_demo of IPRO SDK 2.2.1. The chip, its applications and flashing from the command line are described on IPRO6S.
| Item | Version |
|---|---|
| IPRO Workbench | 0.1.1 or later |
| IPRO SDK | 2.2.1 or later |
| IntelProCube | 0.7.0.1 or later (it has the partition table for the IPRO6S, partition_cfg_fw_direct.toml) |
Building, Flashing and Monitoring ipro6_demo
-
Connect the probe and the board. Connect the IPRO Debug Probe to the computer with the USB cable, and then connect the probe to the IPRO6S EVK.
You should see: IPRO Debug Probe and its two ports, UART and CCI, appear under Board in the side bar.
-
Select the application. Under Applications in the side bar, click ipro6_demo (in the
platformcategory; you can typeipro6in the search box).You should see: the toolbar shows
ipro6_demoand the board changes to IPRO6S EVK by itself; the chip label under Board in the side bar isIPRO6S. The board follows the application's chip, so you do not choose it yourself. -
Select the port when two boards are connected. With two boards connected at the same time (for example a Reef and an IPRO6S EVK, each on its own probe), click the board name on the toolbar, choose Select Port… and pick the UART of the probe on the IPRO6S EVK. With one board you can skip this step.
-
Build, flash and monitor. Click Build, Flash and Monitor (
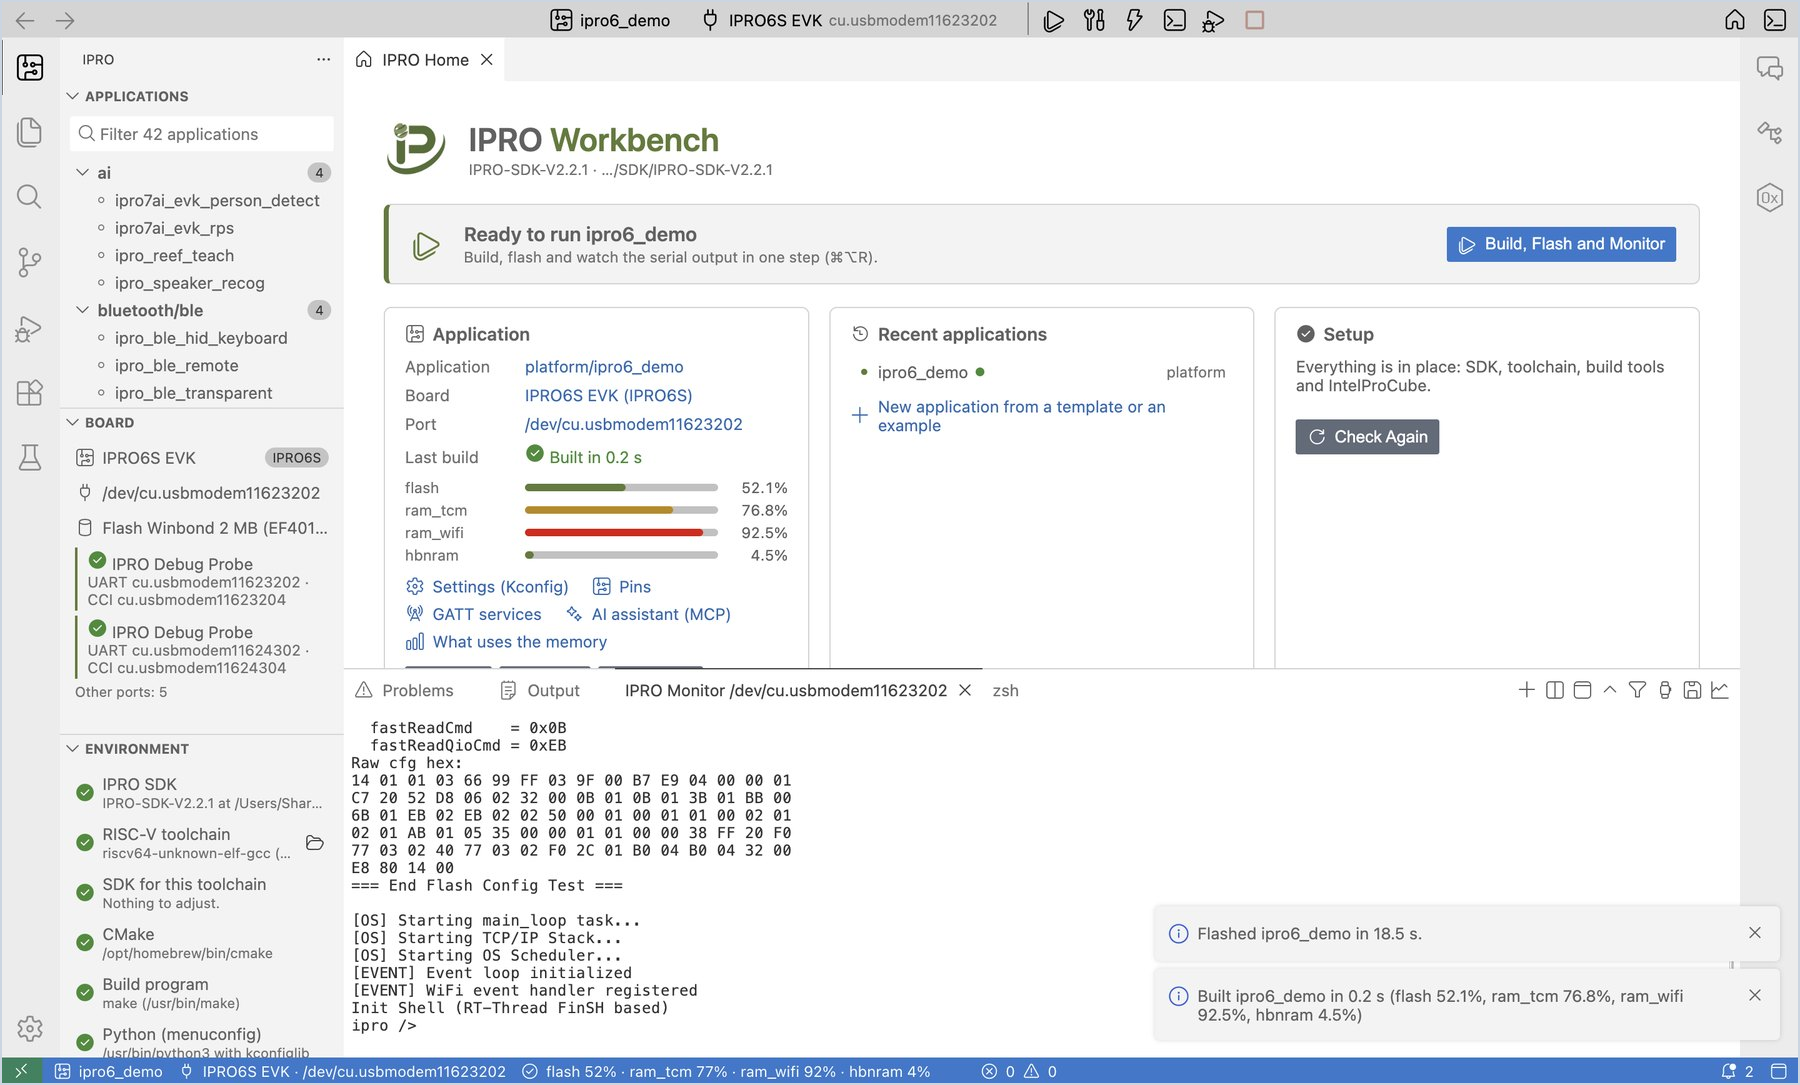
Cmd+Alt+R/Ctrl+Alt+R).You should see, in this order:
- IPRO Build compiles up to
[100%] Built target ipro6_demo_IPRO6.elf. - The first line of IPRO Flash is "Partition table: …/chips/ipro6/partition/partition_cfg_fw_direct.toml"; the command after it has
--chipname ipro6 --chip-variant IPRO6Sand--pt …/partition_cfg_fw_direct.toml; the last line is[All Success]. - IPRO Monitor opens, the board restarts, and the output ends with
Init Shell (RT-Thread FinSH based)and the promptipro />.
- IPRO Build compiles up to
-
List the board's commands. Type
helpin the monitor and press Enter.You should see: the board lists its commands, among them the Wi-Fi commands (
stack_wifi,wifi_sta_connect,wifi_ap_start) andiperf. Wi-Fi Throughput (iperf) in Testing and Measurement uses these commands.
Important
The IPRO6S EVK must be flashed with partition_cfg_fw_direct.toml; the IDE selects it by itself. When the IntelProCube version is too old to have this table, the IDE does not flash and shows "IntelProCube has no partition_cfg_fw_direct.toml, the partition table ipro6_demo flashes with. Without one the board would not boot. Update IntelProCube, or choose a partition table for ipro6_demo." Click Install IntelProCube to install the new version, and flash again.
Creating an Application for the IPRO6S EVK
-
Start a new application. Click + (New Application…) above the Applications list.
-
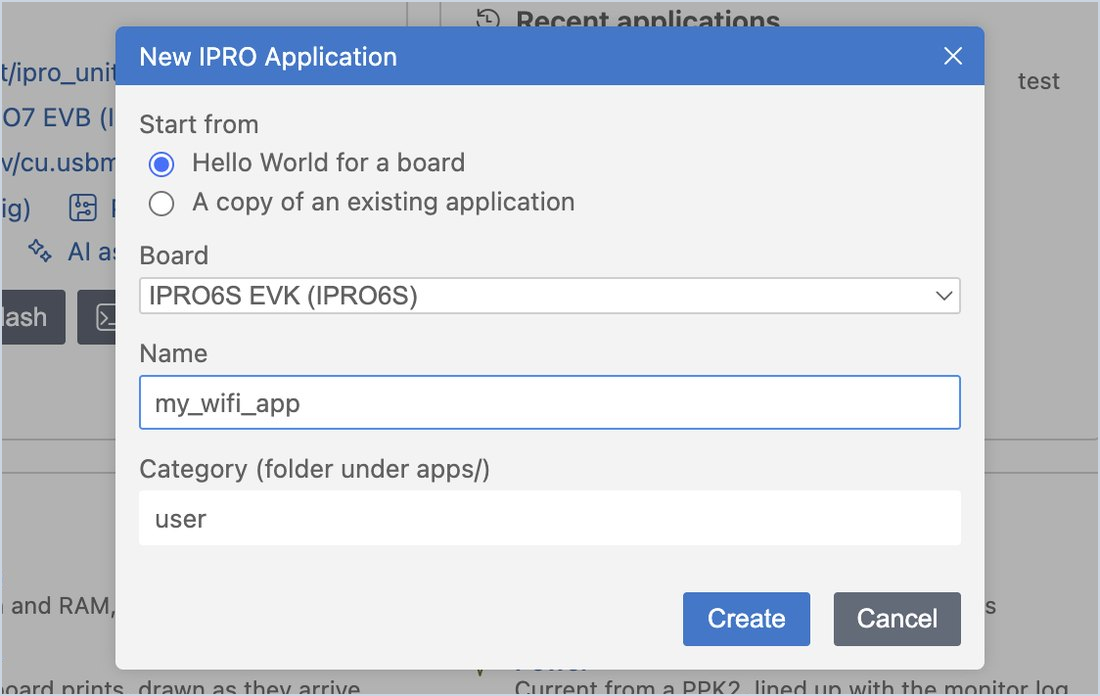
Fill in the form. Under Start from, choose Hello World for a board; under Board, choose IPRO6S EVK; enter
my_wifi_appas the name and click Create.You should see: the list has a new
user/my_wifi_app, the board on the toolbar is IPRO6S EVK, and the editor opens itsmain.c. -
Run it. Click Build, Flash and Monitor.
You should see:
Hello from my_wifi_appappears in IPRO Monitor.
Differences from the IPRO7 Series
IPRO6 series boards print no firmware build time, partition table or flash ID at boot, so the functions that rely on these messages do not apply to the IPRO6S EVK:
| Function | On the IPRO6S EVK |
|---|---|
| Checking the firmware on the board (the "Runs …" line under Board) | Not shown. Confirm the flash by [All Success] in IPRO Flash and the boot messages in the monitor. |
| Comparing the partition table with the board's (On the board) | Not compared. Partition Table still shows the table a flash writes. |
| Detecting the board's flash at boot | Not detected at boot. After one flash, Board shows the flash that IntelProCube read while flashing (for example "Flash Winbond 2 MB"). |
| AI model | Does not apply (the NPU is an IPRO7AI feature). |
Building, flashing, the serial monitor, Settings (Kconfig), pin configuration, the memory map and Wi-Fi throughput (iperf) work as described on the other pages.