Install IPRO Workbench
This page takes you from installing IPRO Workbench to the point where the IDE finds your board. When you are done, the IPRO Home banner shows "Ready to run". It covers IPRO Workbench 0.1.1; buttons and other interface labels are shown in bold as they appear in the English interface.
Prerequisites
| Item | Details |
|---|---|
| Computer | macOS 12 or later (Apple silicon) or Windows 11 (x64), with access to GitHub. The IDE, tools and SDK need about 4 GB of disk space in total. |
| Installer | macOS: IPRO-Workbench-0.1.1-mac-arm64.dmg; Windows: IPRO-Workbench-0.1.1-win-x64.exe. Download it from the IPRO Workbench releases page on GitHub (see Download and verify); no GitHub account is needed. |
| Board | IPRO7AI Reef EVK V4.0, or IPRO6S EVK |
| Probe and cable | IPRO Debug Probe, and a USB cable to connect it to the computer |
| Also needed on macOS | Xcode Command Line Tools, and CMake and Ninja from Homebrew (see Complete the development environment) |
Download and verify
| File | System | Size |
|---|---|---|
IPRO-Workbench-0.1.1-mac-arm64.dmg |
macOS 12 or later, Apple silicon | 199 MB |
IPRO-Workbench-0.1.1-win-x64.exe |
Windows 11, x64 | 160 MB |
-
Download the installer. Open the IPRO Workbench releases page https://github.com/INTELPRO-INC/ipro-workbench/releases/latest and, under Assets, download the installer for your system.
-
Verify the downloaded file to make sure it is not damaged or replaced:
You should see: the same value as the one listed below for the same file (Windows shows it in uppercase).
SHA256SUMS.txton the releases page also lists these values.
The ZIP, latest-mac.yml, latest.yml and blockmap files on the releases page are for the built-in update function; you do not need to download them.
Install
-
Install the program
Open
IPRO-Workbench-0.1.1-mac-arm64.dmgand drag IPRO Workbench into the Applications folder.- Double-click
IPRO-Workbench-0.1.1-win-x64.exe. - Windows may show "Windows protected your PC". Click More info, check the app name, and then click Run anyway.
- When the installer wizard asks who to install for, choose to install for the current user only (no administrator rights needed). You can then change the installation folder; click Install, and when it is done, click Finish.
You should see: IPRO Workbench appears in the Start menu and on the desktop.
- Double-click
-
Open IPRO Workbench
Open IPRO Workbench from Applications.
If macOS says it cannot verify the developer the first time you open it, go to System Settings → Privacy & Security, scroll down to the IPRO Workbench entry, click Open Anyway (the wording differs in some macOS versions), and open IPRO Workbench again.
Open IPRO Workbench from the Start menu.
You should see: the IPRO Workbench window, with IPRO Home in the middle and the IPRO side bar on the left (Applications, Board, Environment). It looks the same on macOS and Windows.
Tip
For mass deployment by IT staff, use a silent install: IPRO-Workbench-0.1.1-win-x64.exe /S, or set the installation location with /D=<folder> (/D must be the last parameter).
Interface language
When the system language is Traditional Chinese, IPRO Workbench starts in Chinese the first time. To change the language, press Cmd+Shift+P (Ctrl+Shift+P on Windows) to open the command palette, type Configure Display Language, choose a language, and restart when prompted.
Complete the development environment
IPRO Workbench checks every tool needed for development by itself and lists the results under Environment in the side bar.
| Item | Purpose | Can Fix Environment install it? |
|---|---|---|
| IPRO SDK | Source of the applications, drivers and examples | Yes, the latest release from GitHub |
| RISC-V toolchain | Compiles the firmware | Yes |
| CMake, Build program | Generates and runs the build | Yes on Windows (in one package with Ninja and Python); on macOS, install them with Homebrew |
| Python (menuconfig) | Settings (Kconfig) and Menuconfig | The kconfiglib package must be installed separately (see below) |
| IntelProCube | Flashing | Yes (it installs 0.7.0.1 or later, which the IPRO6S EVK needs) |
| clangd (code navigation) | Go to definition, errors as you type | Yes, downloaded by the clangd extension (after Fix, the extension asks once more whether to install it) |
| OpenOCD (debugging) | JTAG debugging (not available yet in this release) | Yes on Windows; building and flashing work without it |
| Board | Finds the IPRO Debug Probe | Just plug in the probe |
| SDK for this toolchain | Windows only: lets IPRO SDK 2.2 build on Windows | Yes |
| macOS quarantine | macOS only: tools downloaded with a browser are blocked by the system | Yes, the flag is removed after you confirm |
-
Look at the banner at the top of IPRO Home. When something is missing, it says "Finish the setup" and tells you how many items are still missing.
-
On macOS, install the Xcode Command Line Tools and the build tools first in Terminal (skip this if they are already installed):
-
Click Fix Environment.
You should see: the Output panel at the bottom switches to IPRO Setup and shows each item being downloaded from GitHub and installed. The tools go into
IPRO/tools/<tool>/<version>in your home folder (%USERPROFILE%\IPRO\toolson Windows). When it finishes, every row under Environment has a green check mark, and the IPRO Home banner moves on to the next step. On a typical network this takes about two minutes. -
Install kconfiglib if it is missing. When the Python (menuconfig) row reports that kconfiglib is missing, run the command shown in that row in a terminal, and then click Check Again at the top of Environment:
-
Use tools you already have (optional). If the toolchain or IntelProCube is already on your computer, you do not need to install it again: in that row of Environment, click the folder icon (Use one already on this computer…) and choose the folder the tool is in. To flash the IPRO6S EVK, IntelProCube must be 0.7.0.1 or later;
RELEASE_INFO.txtin the IntelProCube folder gives its version. -
(macOS) Clear the quarantine flag. A macOS quarantine row means that a tool was downloaded with a browser or a chat app and the system will block it when it runs. Click the lock icon on that row; after you confirm, the IDE removes the flag.
Open the SDK
IPRO Workbench uses the IPRO SDK folder as its workspace.
-
Open the SDK folder. On IPRO Home, click Open SDK… and choose the IPRO SDK folder (for example
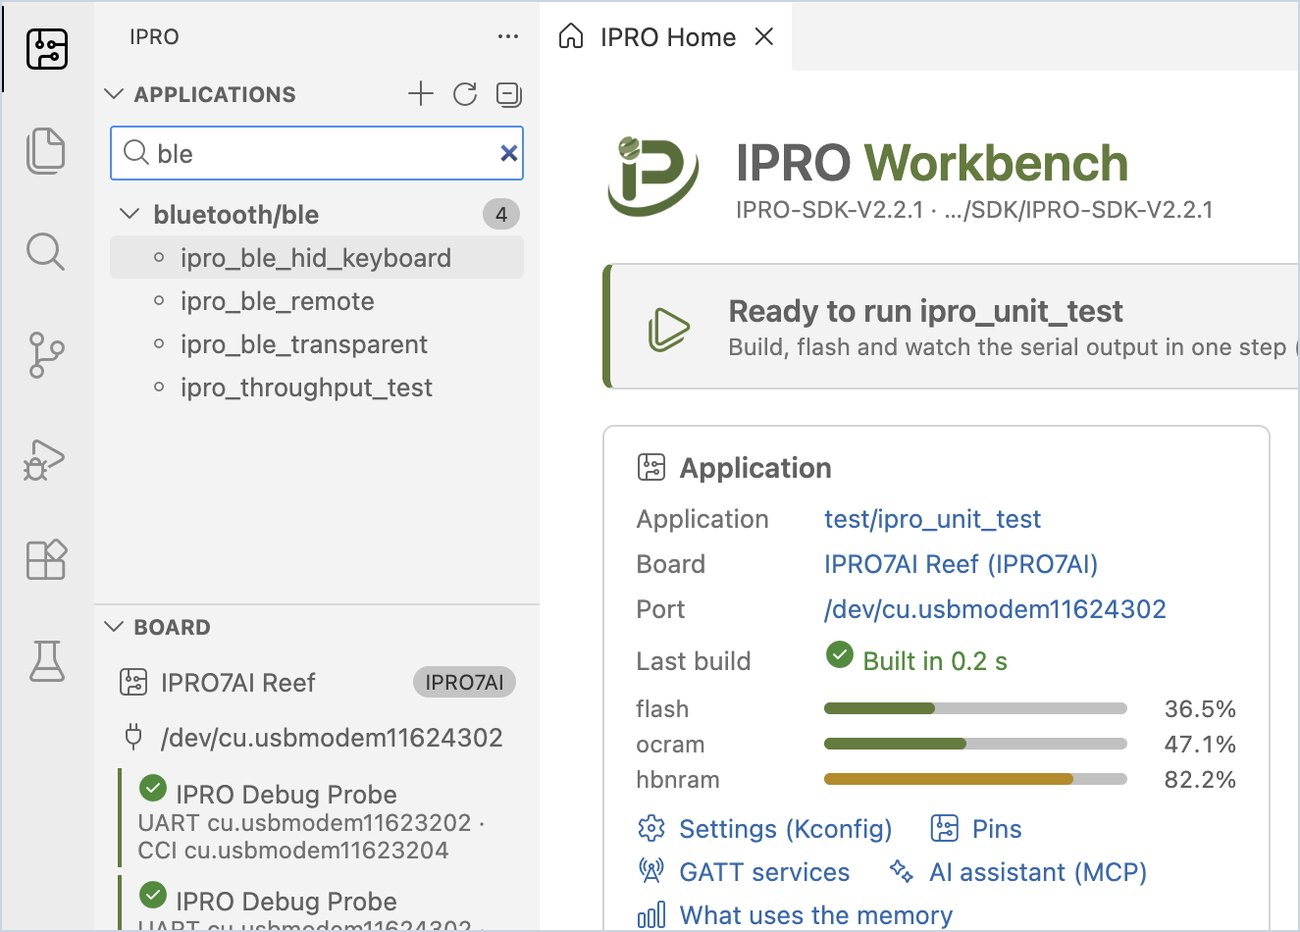
IPRO/SDK/IPRO-SDK-V2.2.1in your home folder). If you do not have the SDK yet, click Install SDK from GitHub….You should see: Applications in the side bar lists the applications in the SDK by category, and the search box reads "Filter N applications".
-
Filter the list. Type a keyword in the search box (for example
ble), and only the matching applications stay in the list. Clear the text to show them all again.
The SDK itself, and how to get it without the IDE, is described in Get Started.
Connect the board
-
Connect the probe and the board. Connect the IPRO Debug Probe to the computer with the USB cable, and then connect the probe to the Reef V4 (the probe goes on the board's debug connector U6; the IPRO6S EVK connects the same way).
You should see: IPRO Debug Probe and its two ports appear under Board in the side bar, for example
UART cu.usbmodemXXXX · CCI cu.usbmodemYYYYon macOS orUART COM5 · CCI COM6on Windows. The same UART port is shown next to the board on the toolbar. -
If the toolbar shows "no probe" in amber, the IDE cannot find the probe: check the USB cable, and connect it directly to the computer rather than through a hub whenever possible.
Note
The probe has two ports: UART is the board's console (both the serial monitor and flashing use it), and CCI is a separate interface. The IDE picks UART automatically; to change it by hand, click the board name on the toolbar and choose Select Port….
Troubleshooting
| Symptom | Fix |
|---|---|
| macOS says the developer cannot be verified on the first launch | Go to System Settings → Privacy & Security and click Open Anyway (see Install). |
| Installation shows "Windows protected your PC" | Click More info, check that the app name is IPRO-Workbench, then click Run anyway. |
| CMake or the build program is reported missing (macOS) | On macOS the IDE does not install the build tools. Run xcode-select --install and brew install cmake ninja in a terminal, then press Check Again. |
| The Python row says kconfiglib is missing | Run the pip install command shown in that row (see step 4 above), then press Check Again. |
| The toolbar shows "no probe" in amber | The IDE cannot find the IPRO Debug Probe. Check the USB cable and connect the probe directly to the computer if you can; once it is plugged in, it appears automatically within a few seconds. |
For anything else, see Troubleshooting.
Next steps
- First Run: build, flash and monitor
ipro_unit_test, then create your own application. - Shortcuts, Commands and Settings: every shortcut, IPRO command and
ipro.*setting in one place.